Flashing – this is what can make or break a deck’s lifespan. And no, I’m not talkin’ about running around in a raincoat and little else! Flashing tape and/or metal flashing will divert water away from critical points on your deck, preserving the wood and maintaining a solid structure.
The three main areas I’ll cover here are beams, ledgers and handrail post blocking.
Beams –
If you build East of the Mississippi, chances are you use doubled or tripled 2x as your support beams. These are just beams built up by nailing multiple 2x members together. Any time you nail 2 pieces of wood together, you create a spot for water and debris to sit on…and eventually rot out. I pulled a built up beam apart to find this amount of rot between the plys.

One problem is you can’t see the rot as it’s hidden between the 2x plys. It will continue to degrade until one day, the beam fails – most likely when there’s a hefty load of people on the deck.
Solution? Run a strip of 4” wide flashing tape across the top of the doubled beam (6” wide for triples) to prevent water from seeping down between the plys. To eliminate topside penetrations, use hurricane straps such as Simpson H1s or H2.5s to secure your joists to the beam w/o running nails through the flashing tape.
For those builders who use 4x solid beams, the use of flashing tape will prevent debris from sitting on the beam top, hastening rot.

One additional thing I do is build ‘hats’ out of metal flashing for the tops of my 6×6 support posts. This keeps water from wicking into the exposed end grain and rotting out the tops of my posts.
One important thing to note – if you use metal flashing (aluminum) w/ ACQ pressure treated wood, you MUST put a barrier between them. The chemicals in the ACQ pressure treated wood will eat the aluminum flashing in short order. What I do is skin the bottom of the metal w/ flashing tape so the metal doesn’t touch the pt wood. If you have access to MCQ treated wood, this isn’t an issue for you.
Ledgers –
Can NOT stress the critical nature of this connection ENOUGH. 95% of the deck failures you read about across the country happen because the ledger failed for one reason or another. I will cover proper ledger connections in another blog, but for now, let’s talk flashing.
I flash ledgers in a multi-part process.
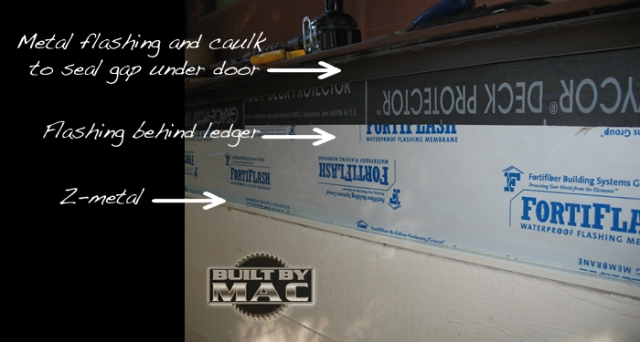
1. Install Z-flashing over top edge of cut house siding (beneath ledger board)
2. Install flashing tape over top of Z metal and up the side of the house to top line of ledger.
3. Under French and sliding glass doors, I install metal flashing and caulk to seal that area from water intrusion. I can’t tell you how many times I’ve pulled off old ledgers to find the house wall rotted out under the French or sliding glass door! Not a pretty sight!

4. Install ledger board.
5. Install 4” flashing tape over top edge of ledger board and up the house wall under the house wrap.

Handrail Blocking –
OK, one more thing on flashing…if you’re building a deck where the handrail posts will be top-mounted (usually in a metal post situation), you’ll want solid blocking under the handrail post location. That way, the lag screws will have a large chunk of wood to bite into, providing a secure connection for the post.Again, you’ve got wood nailed right next to wood so… flash that sucka!


